Monday 4 July 2016

How To Make An Anastasia Necklace (Egg in the Basket)


Have you ever thought or felt like making an "egg in the basket" jewelry? ("egg in the basket", that's what my bead trainer calls it that year)lol... 😀 but i call it "Anastasia Necklace"... You can rename it if you feel like... Lol

Ok enough of the intro and let's go back to business... This jewelry always comes out beautiful although it requires time and patience especially when you want to make 2 or more layers!!! 
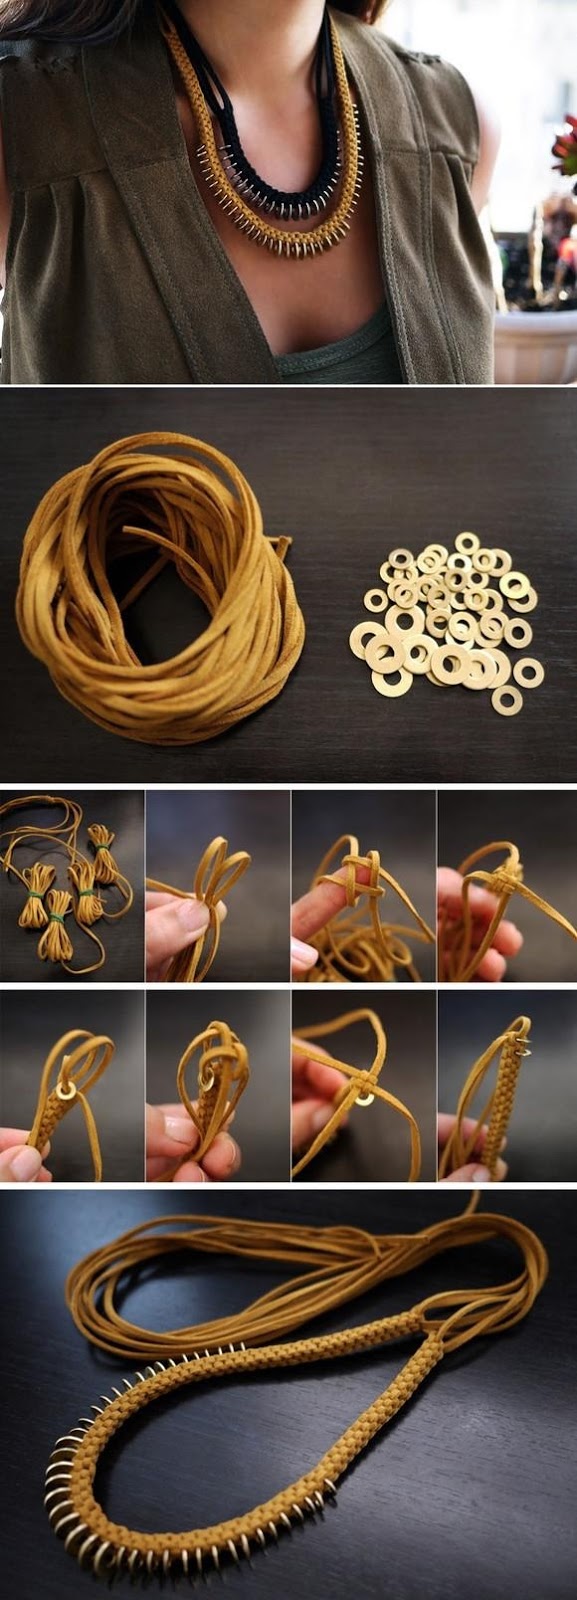
MATERIALS NEEDED:
. 0. 15mm white beads
. metalic silver glass seed beads
.  transparent glass seed beads
. Cone bead cap
. pearl beads(chocolate)
. Pearl beads(light brown)
. Pearl beads(white)
(Crystal beads can be used to replace pearls if you want too)
. Hook 

TOOLS
Beading needles
Fishing line
Cutter

TECHNIQUES TO KNOW
. bead weaving
. Cord ends

Tip: First you have to add a stopper bead and i prefer to use a seed bead as i can blend it in. 

1. Add 1 pearl, 1 seed bead, 1pearl, 1seed bead, 1pearl, 1seed bead

2. Go through the last seed bead and pearl so you can form a " circle"

3. Add 4 silver seed beads 1 grey and 4 silver seed beads

4. Go through the seed beads in between pearls

5. Repeat steps 3 and 4 two more times

6. Pass the needle through the 4 silver seed beads and 1 grey. The needle has to come out through the grey seed bead

7. Add 1 pearl and go through the other grey seed bead

8. Repeat step 7 two more times

Repeat step 3-5 for another row with seed beads

Repeat step 6-8 for another row of pearls

Follow the pattern and make changes according to the desired color pattern or length.


Attach the cone bead cap at the ends as in the image. Make sure you are attaching the closed jump ring from the hook, before glueing the bead cap.

Tip: you can use glue to attach the bead cap

Ok ok.... Thats it .....
I hope you all try this soon!!!
Love y'all


Friday 1 July 2016

What Length Should I Order My Necklace?

As a handmade jewelry designer, I am the one who makes the decision whether a necklace design is long,short or somewhere in between. The most common necklace lengths is 16",18" and 20" long.


A choker, collar or petite length necklace would be around 14" to 15". Your necklace would sit just around the base of the neck. You may also want this shorter length for child-sized jewelry.

Industry standard length starts at a 16 length. This size fits most! I find that this length hits just below the collarbones on most people.

18" or 20" is a good choice if you prefer a looser fit. This is also the style known as 'princess' length(17" to 19"). This necklace style also gives you a few more options to mix and match necklaces with different lengths/layers.

20" to 24" let's pendants and charms hang a little more freely,giving a more casual vibe. This is also called "MATINEE" necklace length.

28" to 34" is an "OPERA" length. This size may allow you to create a double-stranded necklace option and gives a lot of versatility.

Over 45" is often called a "ROPE" length and is the longest option available for necklaces. You often see this length of necklace used in pearl strands.

I hope these helps you in terms of choosing the right size of jewelry you
 desire.

Happy New Month to y'all
Cheers

Wednesday 29 June 2016

Been Long I Posted


Hello, friends! It has been much too long since I have blogged here... my website is undergoing a complete overhaul and there have been a million other things going on, but it's no excuse for leaving this blog on the burner for so long...

If you are checking in and checking things out, thank you! I'm glad you are here... posting starts fully pretty soon!!!

Tuesday 20 October 2015

28 DIY ideas to make your own statement necklace

Jewelry is a weak point of almost all ladies out there. Every girl is constantly on the hunt for new,creative and crazy ways for style statement.

Beading and jewelry designs have always been popular among the crafting commonly,but the past few years have been seen DIY jewelry become bigger than ever.

Some people assume that they need loads of expensive materials or tones of patience to work with tiny pieces of material. It may be true for those that make fine and artisan jewelry!!!

But here you will find simple ways to make beautiful necklaces that you can wear proudly...

These DIY necklace ideas allow you to personalize your jewelry pieces with whatever you like,creating a unique necklace that no one else will have!!!


Necklace is very important because it's easy to add to any outfit and can often be the one thing that takes your outfit from standard to striking!!!

Here are 28 beautiful necklaces for your next DIY jewelry project...
1


2


3


4


5


6


7


8


9


10


11


12


13


14


15


16


17


18


19


20


21


22


23


24


25


26


27


28

Now when somebody asks you where you bought your necklace, you can reply proudly, "I MADE IT"


DIY Knotted Leather Pearls


Ready for something easy? This project takes two materials and requires nothing more complicated than knowing how to tie a knot!!! This piece is also incredibly versatile. You can wear it any number of ways as a necklace or wrapped around your wrist for a bracelet.

Tools and Materials
2.5yards of 1.5mm round leather cord
12mm pearls with at least a 2mm hole(i used 16pearls)


On one end of the cord,knot two pearls in place with knots on either side of the pearls

Continue knotting and adding pearls,roughly spacing them 5inches or so apart. Once at the end of the cord, add another set of two pearls!!! Trim the ends of the cord as needed.
You can wear it as a wrap bracelet or loosely draped like a lariat necklace.

Send in comments!!! THANKS


Saturday 26 September 2015

DIY BOHO TASSEL BEADED BRACELET!!!

This is just the perfect season to enjoy wearing many jewels together in different styles,in many shades and colors with many charms. In the trendy style for this period,the gypsy boho one. You know chains,leathers,beads,tassels,charms and many more!!! But if you are not the greatest fan of this style,i am totally sure that this dainty tassel bracelet will change your mind!!!


Materials:
Beads(4beads of 4mm)
Coral beads
Tassel
Gold plated chain
Gold plated clasp
Jump rings(two different sizes because the chain has small rings)
Pins(one eye pin and one head pin)
Plier set


Let's start by creating the beaded parts. Use the eye pin and pass the beads,creat a loop on the second end and make a beaded bar,use also the head pin to make a tiny bead charm with the coral bead.


Now, let's play with the chain and create the first layer of the bracelet. Connect the beaded bar with the end of the gold plated chain. Measure it on your hand and cut a piece of chain that is a little smaller.


Connect the second end of the bracelet bar with the chain, creating a closed bracelet.


Cut the chain in the middle, in order to add the clasp


We can continue now by creating the second layer of the bracelet and of course finishing it. So first of all, add one small and one larger jump ring on each end of the chain.


Cut the second piece exactly the same in length with the first one and connect it with a small jump ring.


Repeat the previous step in both ends of the chains, but in one of them connect the spring clasp.


Your main double layer bracelet is ready. Let's decorate it a little bit more with a tiny tassel, that I adore.


Complete the charm bracelet. Connect with a jump ring the mini tassel and the coral bead with the chain of the second bracelet.


I liked it to have the charm almost in the middle  of the chain,but it's up to you where you wish to have it.


Your bracelet is ready!!! A perfect Boho chic bracelet with two layers, one with beads and one with bead charm and a tassel!!!

PERFECT!!!